TLDR: To install GNU Radio on Windows, just install RadioConda and the drivers for your SDR. Create a shortcut, double-click, and you’re running GNU Radio Companion! For hardware support, simply install the drivers for your platform.
The longer version of this post will provide a step-by-step process for using RadioConda to install GNU Radio on your Windows PC as well as building a quick flowgraph to test the installation. I’ll also show you how to enable support for the following hardware:
- HackRF
- PlutoSDR
In addition, I’ll introduce Python virtual environments in general, Conda more specifically, and Radioconda more specifically than that.
What are Virtual Environments?
These are configurations for your computer that include a specific version of Python as well as a number of applications, packages, and dependencies. What’s great is that none of this is installed on your machine itself! You can enter the virtual environment, execute applications, and then exit the virtual environment. Upon exiting, your operating system will return to the state it was in prior to entering the virtual environment.
What is Conda?
Conda is a powerful management tool for virtual environments. You can use it to create any number of Conda environments, and use very simple commands to install hundreds of packages.
What is Mamba?
Mamba is essentially an optimized, higher-performing version of Conda (stuff installs faster).
What is RadioConda?
Finally, we’ve arrived at the tool we’re going to use! RadioConda is based on Conda, but its default configuration includes a ton of SDR-specific packages, such as GNU Radio, RF apps, SDR hardware support, and many key out-of-tree modules. Installing it on your Windows, Linux, or Mac machine will give you an enormous amount of SDR software. And like any other Conda environment, you can enter and exit it at will, leaving your core operating system unaffected.
RadioConda Installation Process for Windows
Navigate to the RadioConda GitHub Page:

Download the Windows installer. If using Edge, you may be temporarily prevented from completing the download. If you click on the downloads button on the upper right, you may see this warning:

Click on the three dots to select “Keep”

And then confirm by selecting “Keep anyway”

Your download should then show as complete

Double-click the installer

Agree to the license

Choose the scope of the installation (“Just Me” is good for most users, unless you want multiple users to have access the software on your machine)

Select a location for the installed files (or just click “Install” to accept the default)

The install will take a few minutes. Click “Next” when it completes

Then click “Finish”

You can now access GNU Radio Companion from your start bar by typing “gnu”

It’s a good idea to click “Pin to taskbar” if you want easy access

Installing HackRF Support
Go back to the RadioConda GitHub Page and find the hardware support section

Clicking the “HackRF (setup)” link leads you down the page to the following:

Clicking the “Install the WinUSB driver with Zadig” link moves you further down the page to this:

Clicking the “Zadig” link takes you to this site, which hosts a general purpose USB driver for windows devices

Scrolling down a bit, you’ll find a download link for the most recent version of the driver. Note that the advertising on this site is… extensive… and that there are may be several other links appearing to be downloads. The “Zadig 2.9” link below is the one you want (although the version may have changed by the time you read this post)

Double-click the installer, and allow it to check for updates online

Then click “Install WCID Driver”

Installing PlutoSDR Support
Go back to the RadioConda GitHub Page and find the hardware support section

Click the “libiio (setup)” link, which leads you down the page to this

Click the link to download, then run the installer, accepting the license agreement

Confirm (or modify) the install location

Then confirm to begin installing

This brings you to an installer wizard, at which you click “Next”

Confirm install from Analog Devices

And Finish

Testing the Installation – HackRF
Bring up GNU Radio by typing GNU into the start bar or clicking the shortcut you’ve made

On the first attempt, I’ve seen a glitch where only a blank window appears. In that case, close the blank window and try again. You should then see the GNU Radio Companion interface.
Create a flowgraph as follows:
- change existing samp_rate variable to “10e6”
- add a Soapy HackRF Source with
- RF Options -> Bandwidth: samp_rate
- RF Options -> Center Freq (Hz): 98e6
- add a QT GUI Frequency Sink with
- General -> Center Frequency (Hz): 98e6
- Connect the source output to the sink input
- Save the flowgraph

Attach your HackRF to the PC via USB. After executing the flowgraph using the Play button in the toolbar, you should a live frequency plot several FM broadcast signals. The specific frequencies you observe will be different depending on the FM broadcasts in your area.

Testing the Installation – PlutoSDR
Bring up GNU Radio by typing GNU into the start bar or clicking the shortcut you’ve made
On the first attempt, I’ve seen a glitch where only a blank window appears. In that case, close the blank window and try again. You should then see the GNU Radio Companion interface.
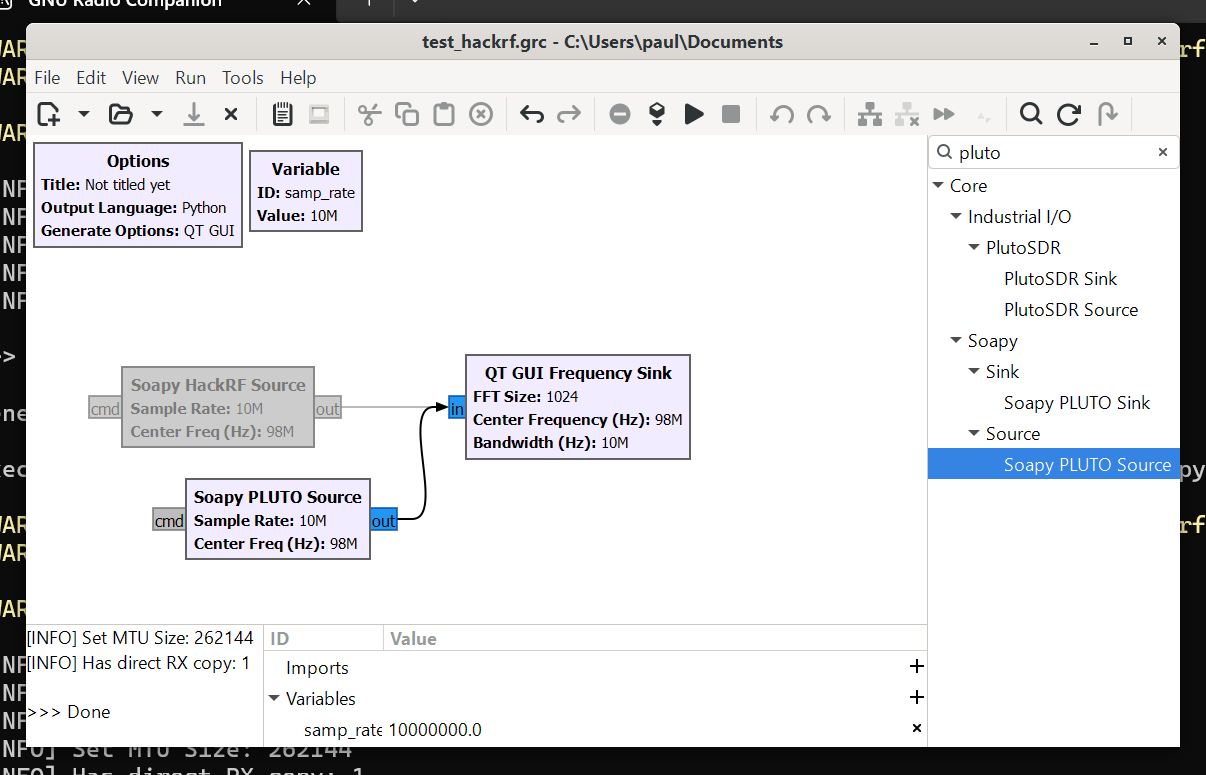
Create a flowgraph as follows:
- change existing samp_rate variable to “10e6”
- add a Soapy PLUTO Source with
- RF Options -> Bandwidth: samp_rate
- RF Options -> Center Freq (Hz): 98e6
- add a QT GUI Frequency Sink with
- General -> Center Frequency (Hz): 98e6
- Connect the source output to the sink input
- Save the flowgraph

Attach your PlutoSDR to the PC via USB. After executing the flowgraph using the Play button in the toolbar, you should a live frequency plot several FM broadcast signals. The specific frequencies you observe will be different depending on the FM broadcasts in your area.